The Essential Guide to Amazon SES WordPress Setup (and Why Your Emails Deserve Better).
If you have ever submitted a contact form on your own website and the response never arrived, you already understand the problem. Most WordPress sites send email the same way they have for years – through the web server’s built-in mail function. It works just well enough to feel reliable, right up until a critical form submission vanishes or a password reset link never shows up. For marketing directors and business owners, that is not a minor inconvenience. It is lost revenue, lost trust, and a support headache that never needed to happen. A proper Amazon SES WordPress setup replaces that fragile default with infrastructure built specifically for sending email at scale – and getting it delivered.
The core issue is reputation. Email providers like Gmail and Outlook decide whether your message lands in the inbox or the spam folder based on a set of authentication signals tied to your domain. When WordPress sends mail through your web server, those signals are either missing or weak. Amazon Simple Email Service (SES) solves this by routing your site’s email through a verified, authenticated sending infrastructure that major inbox providers actually trust.
If your contact form confirmations and internal notifications are landing in spam, the problem is almost never the content. It is the plumbing.
Amazon SES is a cloud-based email sending service from AWS. Unlike your web host’s mail server, SES is purpose-built for deliverability. It handles authentication protocols like DKIM and DMARC on your behalf, maintains sender reputation at a platform level, and scales to handle anything from a handful of form notifications to thousands of marketing emails. For our Site Management clients, it is the standard we recommend because it offers enterprise-grade deliverability without enterprise-grade complexity.
There are other SMTP services out there – SendGrid, Mailgun, Postmark – and they are all solid. We lean toward SES for a few reasons. The pricing is straightforward and extremely low for typical WordPress volumes. For estimating email sending cost, you can visit and calculate Amazon SES Calculator. The integration with the broader AWS ecosystem is useful for clients who already use AWS hosting or services. And once the Amazon SES WordPress setup is complete, it tends to just work quietly in the background, which is exactly what email infrastructure should do.
This is a technical setup, and if you are a marketing director reading this, the goal is not necessarily for you to do it yourself. It is for you to understand what is happening and why, so you can have an informed conversation with your developer or your agency. If you work with No Panic Design through our Design & Build service, this is something we handle as part of the launch process.
That said, here is what the setup requires:
– An AWS account with access to the Amazon SES console
– AWS Simple Email Service with Production Access (not Sandbox Mode), if you are in Sandbox Mode, please first submit a request to AWS Support link to article
– Access to your domain’s DNS zone editor (through cPanel, your hosting provider’s dashboard, or wherever your DNS is managed)
– Admin access to your WordPress installation
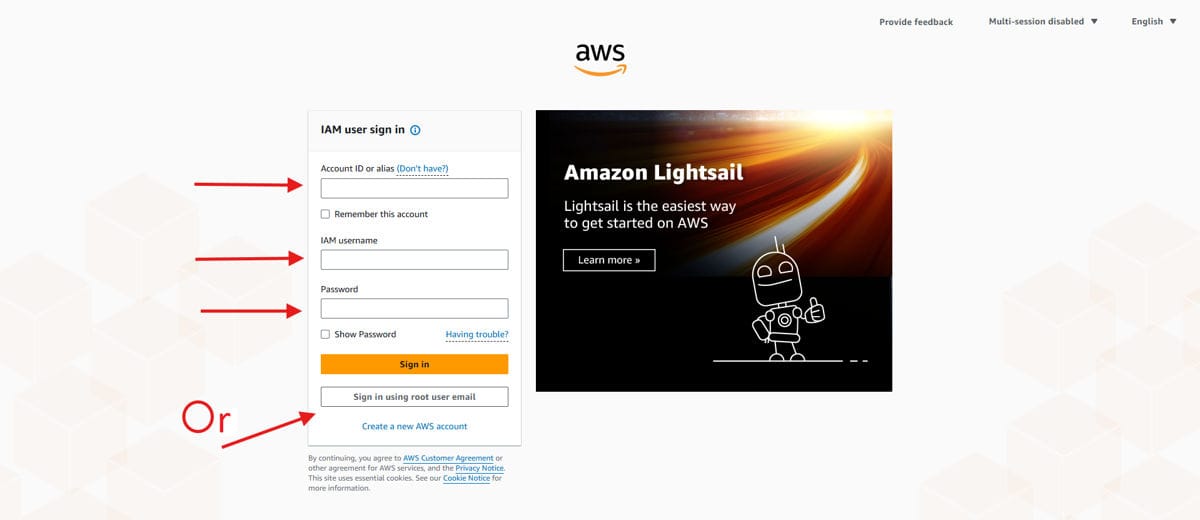
Head over to the AWS Console and sign in with your AWS account credentials. If your organization already uses AWS for hosting or other services, use the same account – keeping everything under one roof simplifies billing and access management down the road.
Once you are inside the console, use the search bar at the top to type “SES” and select Amazon Simple Email Service from the results.
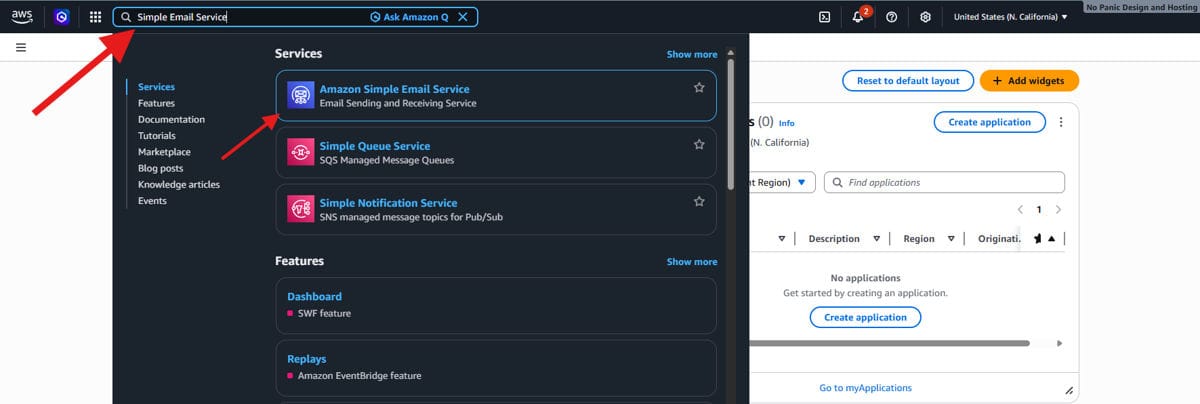
This is the dashboard where you will manage all your sending identities, SMTP credentials, and deliverability settings for your Amazon SES WordPress setup.
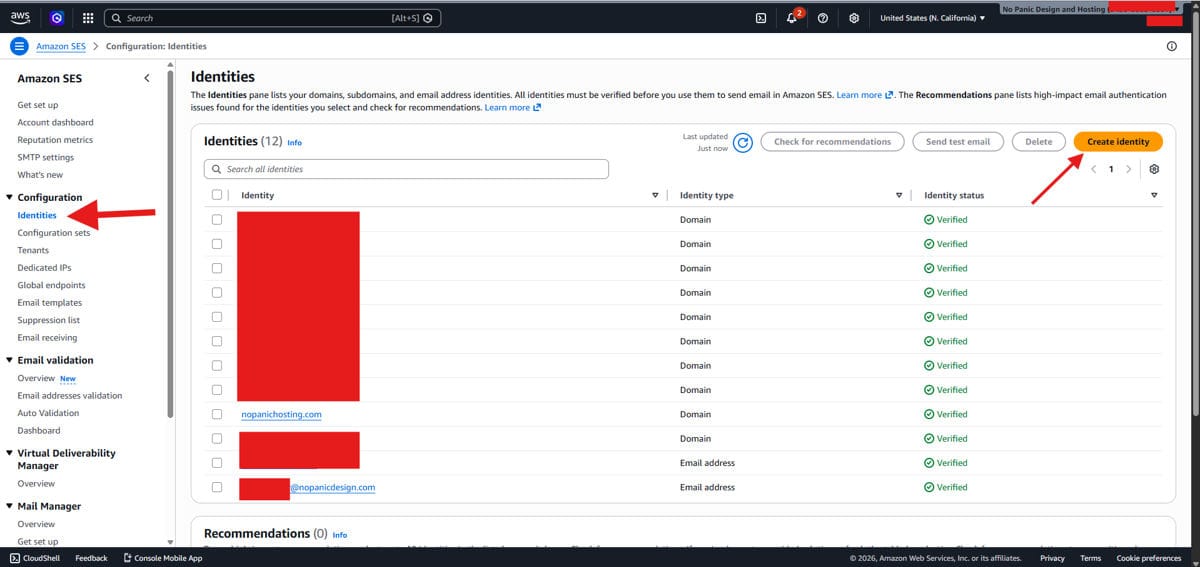
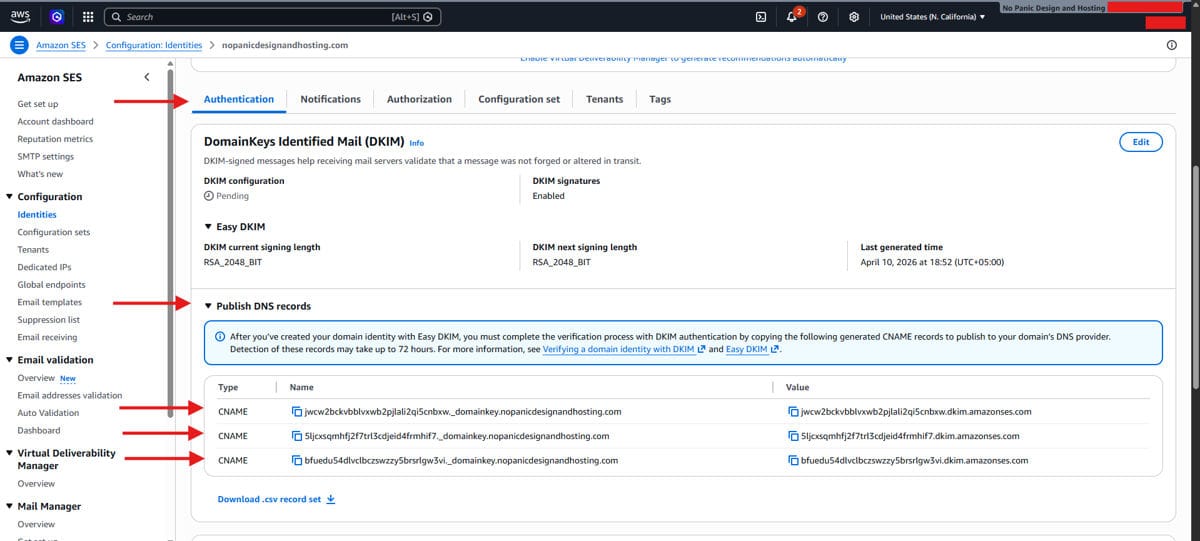
Select “Identities” from the left side panel under Configuration and then select “Create Identity” as shown in the screenshot.
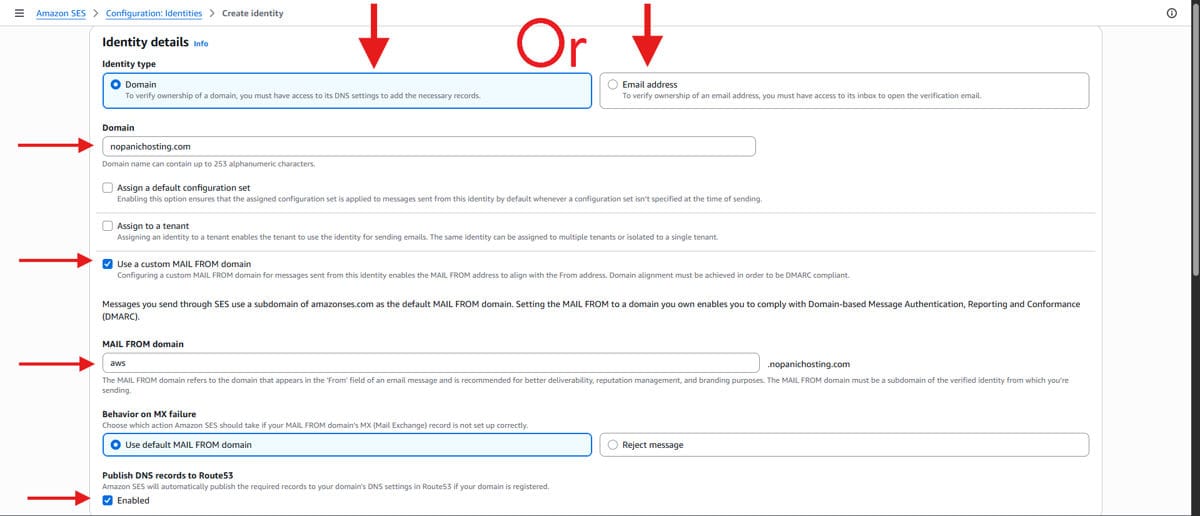
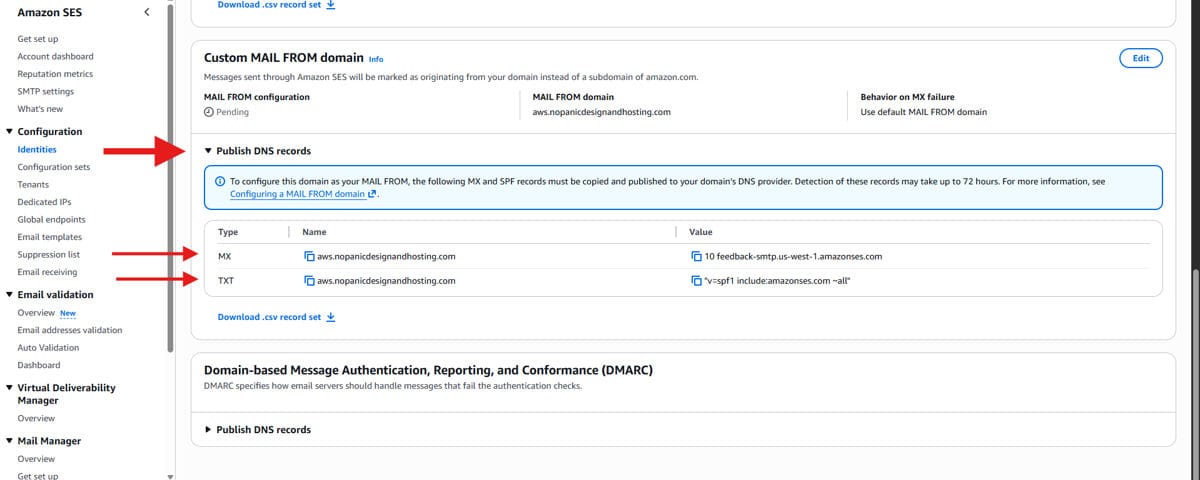
NOTE: If your MX record is already connected to another mailing provider (Google Workspace, Zoho, Outlook), additonally, you want to add Amazon SES, then instead of using mail.yourdomain.com, please use e.g aws.yourdomain.com.
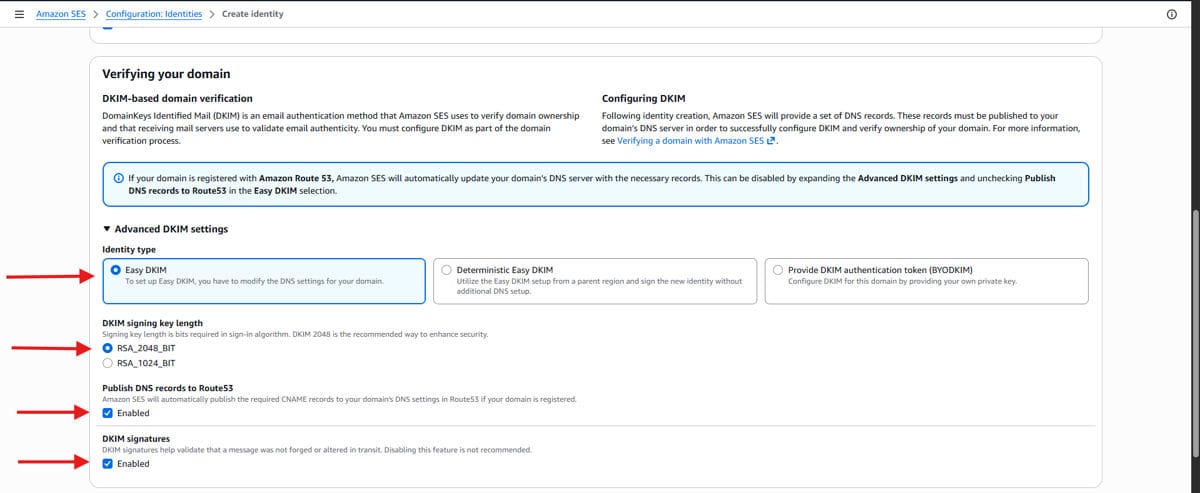
This is the faster path, but domain-level verification is always preferred for production WordPress sites because it covers every address on that domain automatically.
While you are in the zone editor, generate a DMARC record using a tool like DMARCDKIM Generator and add it as a TXT record.
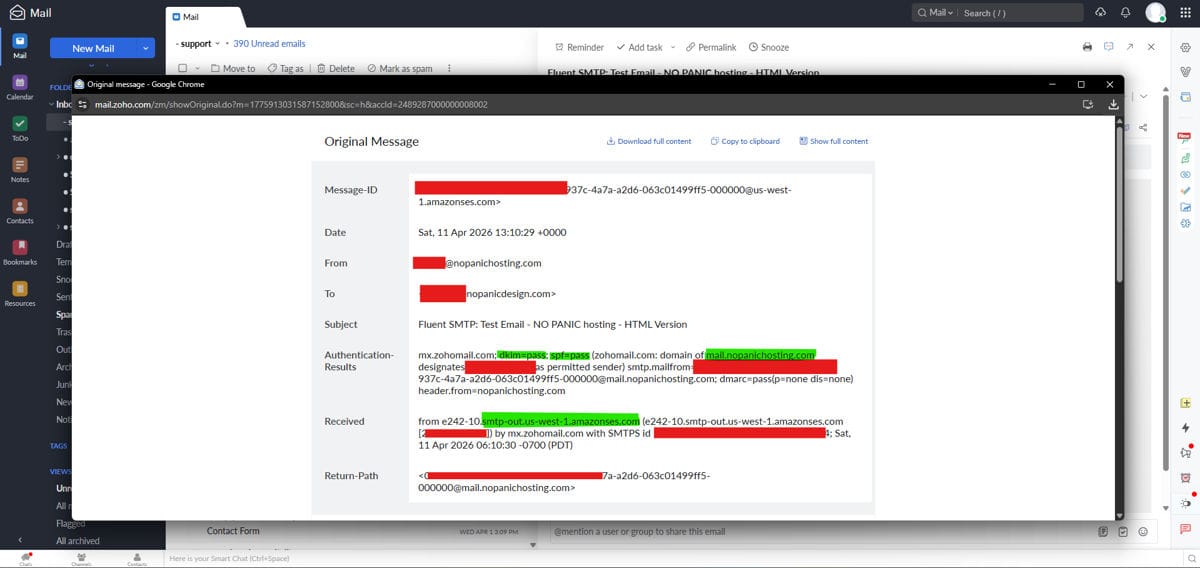
DKIM proves the email is really from you. DMARC tells inbox providers what to do if it is not. Together, they are the reason your messages land where they should.
Before you move on, check your DNS for any leftover records tied to mail.yourdomain.com. If there is an existing A record or CNAME for that subdomain, delete it. Those conflicting records can block SES verification and cause confusing errors later. Clean DNS is happy DNS.
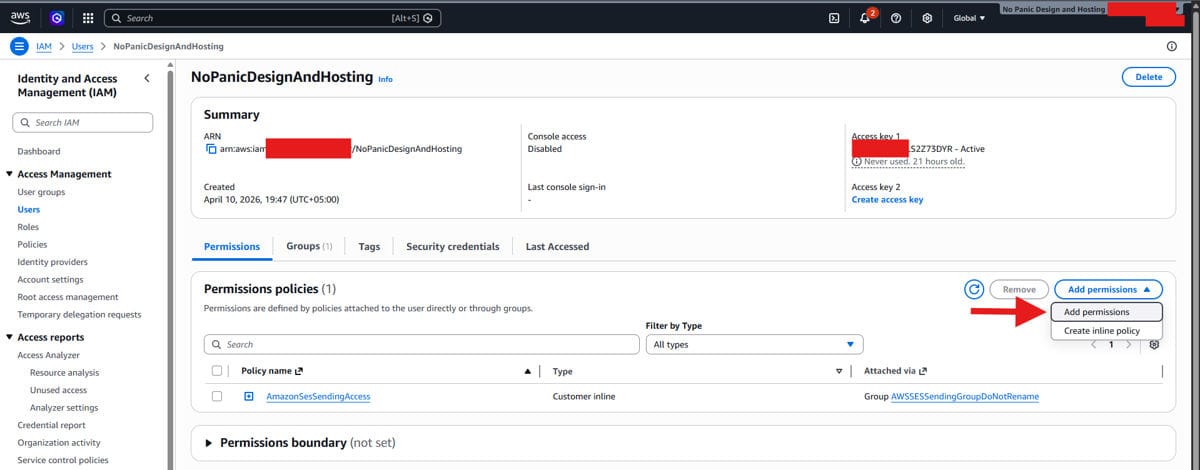
With your domain verified and authenticated, the next step in your Amazon SES WordPress setup is generating the credentials WordPress will use to connect. This creates an IAM user specifically for sending email through SES.
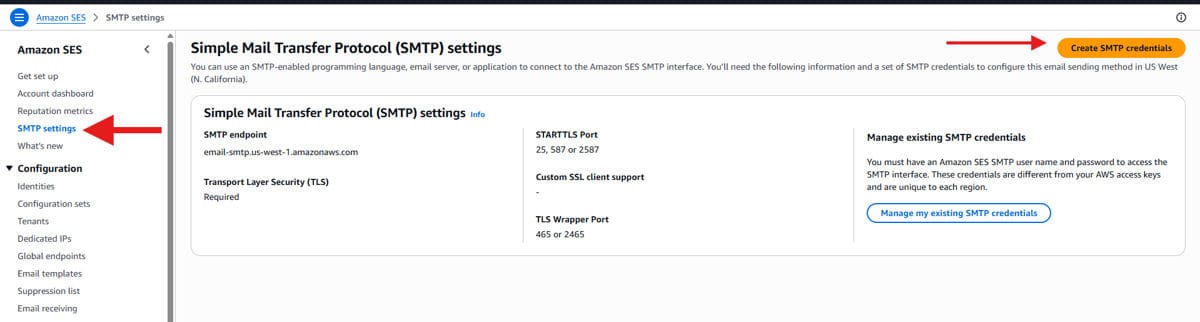
Inside the SES console, navigate to SMTP Settings and click “Create SMTP Credentials” as shown below:
AWS will ask you to name the IAM user. Use the client’s website name or project name – something immediately recognizable. This is not a technical requirement, but when you are managing multiple SES integrations across clients, clear naming saves you from confusion months down the road.
The SMTP user needs the right permissions to actually send email. Follow the steps:
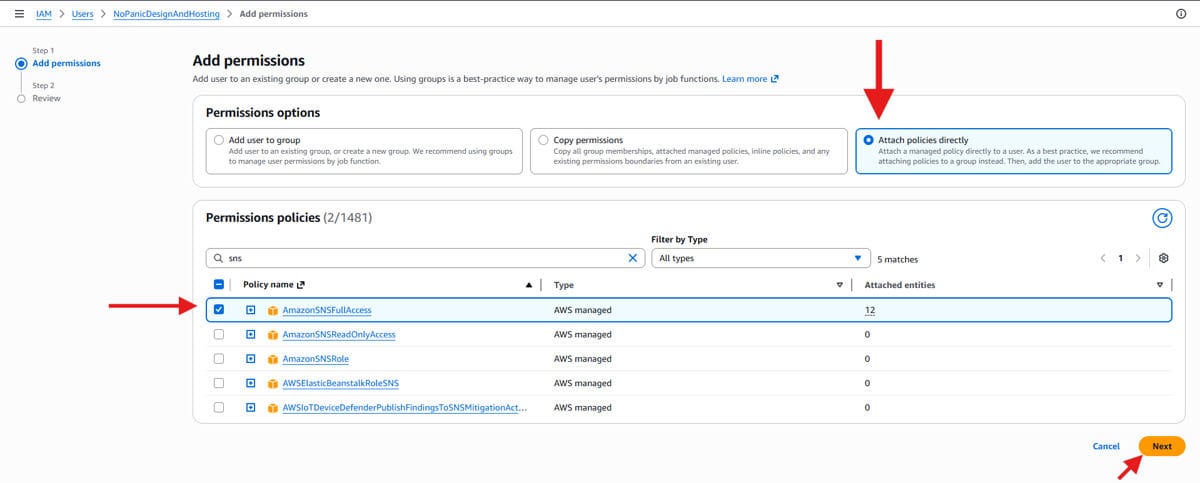
Without these three, the connection may authenticate but silently fail to send – which is exactly the kind of invisible problem that makes email infrastructure frustrating.
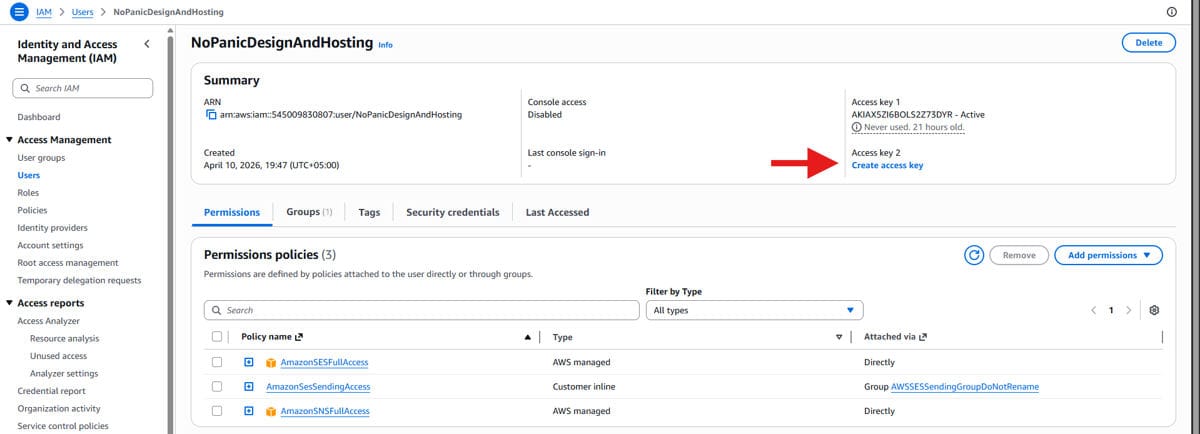
IMPORTANT: Copy and Save both the keys i.e. ACCESS + SECRET KEY, also download the .csv file.
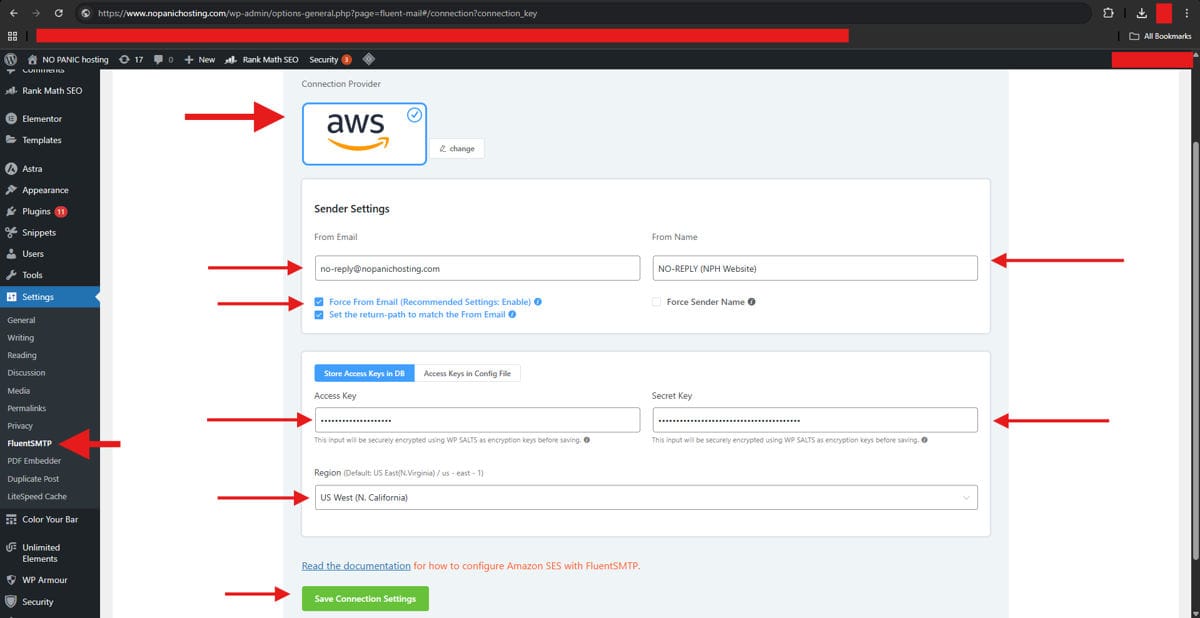
There are several WordPress SMTP plugins available, and we have tested most of them. FluentSMTP is the one we keep coming back to. It is free, actively maintained, lightweight, and has a clean interface for managing multiple email connections.
“Simplicity is the ultimate sophistication.” – Leonardo da Vinci. When it comes to WordPress email plugins, FluentSMTP earns that description honestly.
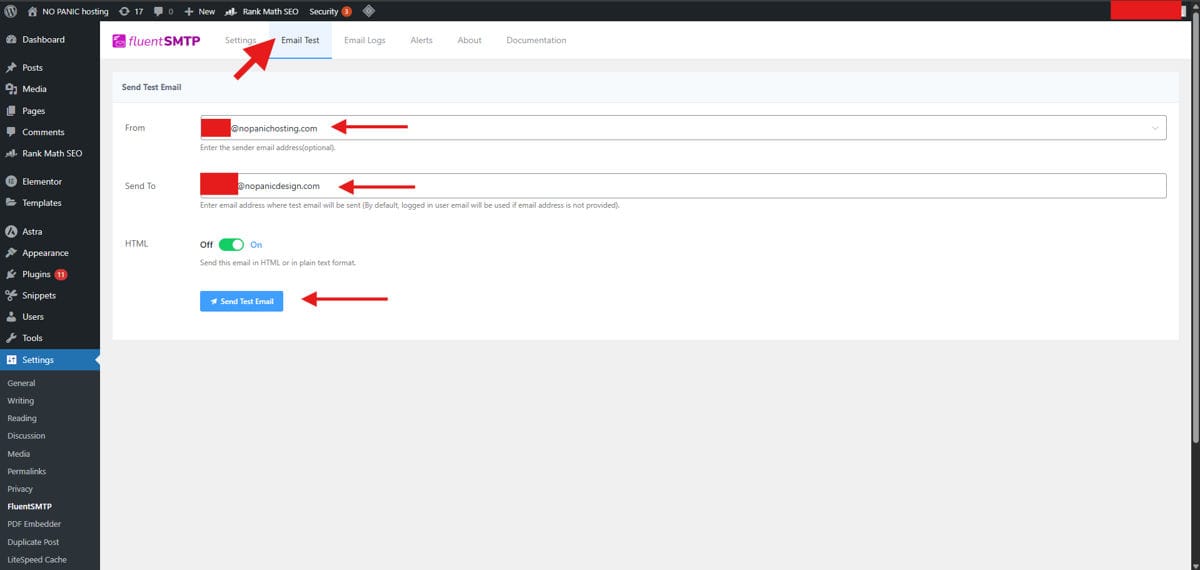
The final step in your Amazon SES WordPress setup is real-world testing.
If FluentSMTP shows a server error when you try to send, the most common culprit is your hosting provider’s email routing configuration. In cPanel, navigate to Email Routing and make sure it is set to “Automatic” rather than “Local” or “Remote.” Some hosting environments override outbound mail settings by default, and this single toggle resolves the issue more often than you would expect.
On non-cPanel hosts, look for similar settings in your hosting dashboard or contact your provider’s support. You are looking for anything that controls outbound mail routing or SMTP relay permissions. The symptoms – a connection that authenticates but fails to send – are the same regardless of the hosting panel.
If messages arrive but land in spam, work through this checklist:
Deliverability is not a single setting. It is the cumulative result of authentication, reputation, content, and sending patterns all working together. The Amazon SES WordPress setup handles the infrastructure side. The rest is about maintaining good sending practices over time.
For marketing directors, the temptation is to treat email infrastructure as a “set it and forget it” technical detail. And honestly, once it is properly configured, it mostly is. But the difference between a site that sends unauthenticated email through a shared web server and one that sends through a verified, DKIM-signed, DMARC-protected SES integration is the difference between inbox and spam. Between a lead who gets your follow-up and one who never sees it.
Every form submission that vanishes, every order confirmation that hits junk, every password reset that forces a support ticket – those are friction points that erode trust with your audience. A proper Amazon SES WordPress setup eliminates an entire category of problems that most site owners do not even realize they have until something important goes missing.
You do not notice good email deliverability. You only notice when it fails. The goal is to make it invisible.
If this feels like more infrastructure than you want to manage, that is completely reasonable. This is exactly the kind of behind-the-scenes work that No Panic Design handles for our clients as part of {Site Management}. We set it up, we test it, and we monitor it so you never have to think about whether your emails are actually arriving.
Website:
https://www.nopanicdesign.com
LinkedIn:
https://www.linkedin.com/company/no-panic-design
Instagram:
https://www.instagram.com/nopanicdesign
Facebook:
https://www.facebook.com/nopanicdesign